

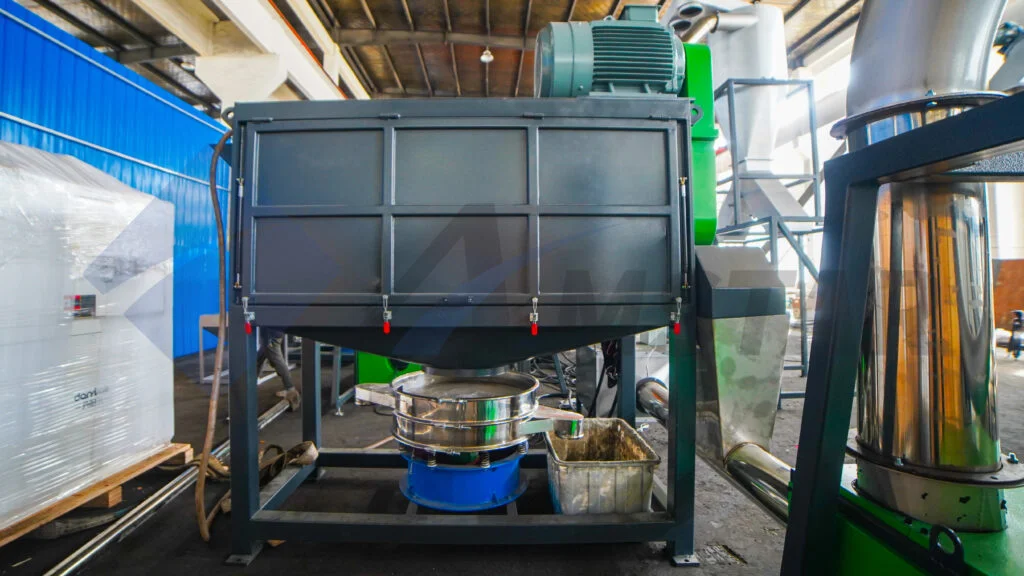
Centrifugal dryers play a vital role in plastic recycling systems, spinning surface moisture off plastic flakes or pellets after washing. The bearing assembly carries the full dynamic load of that high-speed rotor — so regular inspection, correct disassembly, and timely replacement of bearings are essential for stable operation and long service life.
This guide explains how to identify the bearing components, disassemble the assembly safely, and replace the main shaft and bearings correctly on a typical centrifugal dryer used in plastics recycling.
Bearing Assembly Components
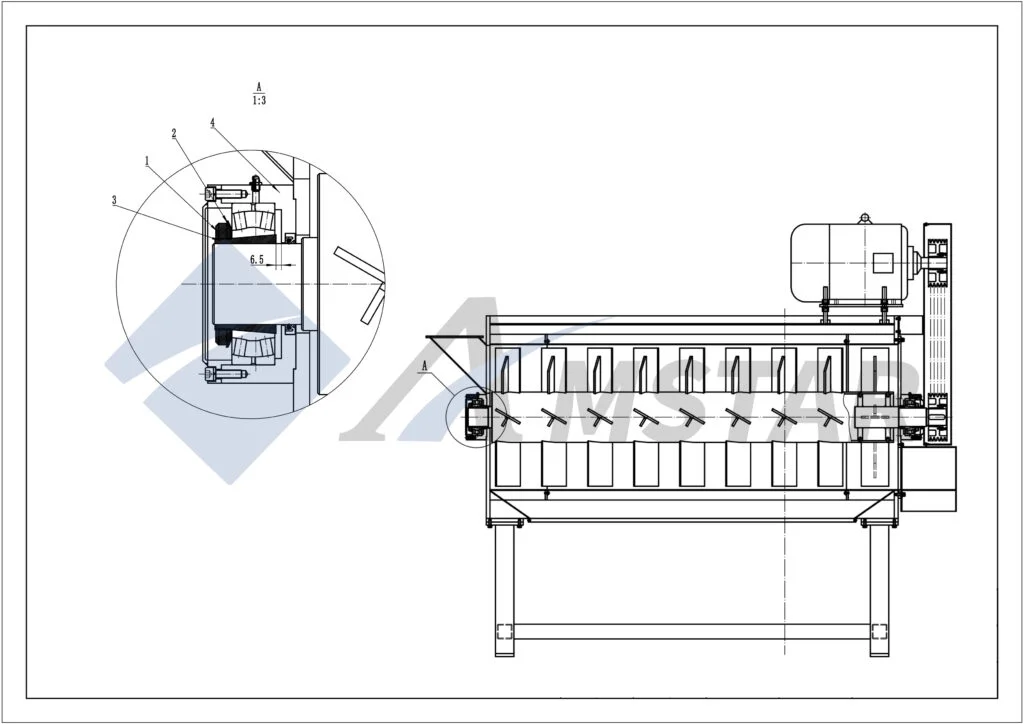
Before touching a wrench, know what you are working with. The bearing assembly of a centrifugal dryer typically consists of:
| No. | Component Name | Description |
| 1 | Lock washer | Prevents the locknut from loosening under vibration during operation |
| 2 | Locknut | Secures the expansion sleeve and bearing tightly to the main shaft |
| 3 | Expansion (adapter) sleeve | Provides a firm, concentric connection between the bearing and the shaft |
| 4 | Bearing housing | Holds the bearing and bolts it to the centrifugal dryer frame |
Safety Before You Start
Bearing work on a centrifugal dryer involves a heavy rotor, stored rotational energy, and tight-tolerance parts. Treat every service as a lockout job:
- Lock out and tag out the main drive and any auxiliary motors; verify zero energy before opening guards.
- Allow the rotor to come to a complete stop — never reach into the housing while it coasts down.
- Wear gloves, safety glasses, and steel-toe boots; the rotor and housing edges are heavy and sharp.
- Support the rotor or shaft before loosening the bearing so nothing drops or binds mid-disassembly.
- Keep the work area clean — grit on a bearing seat is enough to cause premature failure after reassembly.
Step-by-Step Bearing Disassembly
Follow these steps to remove the bearing assembly and prepare for main shaft or bearing replacement:
- Step 1 — Unlock the lock washer. Use a screwdriver or suitable tool to pry open the locking tab of the lock washer (part 1). Make sure the tab is fully disengaged from the slot of the locknut (part 2) before proceeding.
- Step 2 — Loosen the locknut. Turn the locknut (part 2) counterclockwise about 4–5 turns to release pressure on the expansion sleeve. Do not remove it completely at this stage — it acts as a safety stop while you free the sleeve.
- Step 3 — Release the expansion sleeve. Use a hammer and pry bar (or a proper sleeve-driving tool) to gently tap the expansion sleeve (part 3) inward along the shaft. This breaks the tapered grip between the sleeve, the bearing bore, and the main shaft. Work evenly around the circumference to avoid cocking the bearing.
- Step 4 — Remove the bearing housing. Once the sleeve is loosened, pull the bearing housing (part 4) off the main shaft carefully, keeping it square to avoid scoring the shaft journals. The bearing and sleeve can then be cleaned, inspected, or replaced as needed.
Inspection and Reassembly Tips
- Clean everything first. Wash all parts in solvent, dry them completely, and inspect the shaft journals for scoring, fretting, or corrosion before reassembly.
- Check the bearing itself. Rotate it by hand — roughness, play, or noise means replacement, not reuse. Check seals for hardening or tears.
- Use anti-seize grease on the expansion sleeve taper and shaft surface to ensure even seating and easier future removal.
- Use original-specification bearings (correct clearance class and sealing) to preserve rotor balance and design life.
- Seat the sleeve evenly. Drive the expansion sleeve in gradually while checking that the bearing bore reduction stays within the manufacturer’s specified range — over-driving shortens bearing life.
- Verify before restart. After reassembly, confirm shaft alignment, check that the rotor spins freely by hand, re-torque housing bolts, and run a short no-load test while listening for abnormal noise or vibration.
Recommended Spare Parts
Keeping these wear parts on the shelf avoids multi-day downtime when a bearing fails mid-production:
| Part Name | Material / Spec | Typical Lifetime | Maintenance Note |
| Bearing | SKF/NSK standard, correct clearance class | 12–18 months | Replace at the first sign of noise or vibration |
| Expansion sleeve | Carbon steel, hardened | ~24 months | Inspect taper for wear at every service |
| Shaft seal | NBR / Viton | ~12 months | Prevents wash water ingress into the bearing |
| Locknut & washer | Alloy steel | ~36 months | Replace if threads or locking tabs are damaged |
| Rotor screen / paddles | Wear-resistant steel | Varies with throughput | Worn paddles reduce dewatering efficiency |
Video Guide
For a visual step-by-step walk-through, see our “How to Replace a Bearing on a Centrifugal Dryer | Step-by-Step Guide”. The video covers the removal sequence, the tools used, the hammer-and-pry-bar technique, and how to separate the bearing assembly without damaging the shaft.
The centrifugal dryer is usually the last mechanical dewatering stage before thermal drying or extrusion — in a PET bottle recycling line, for example, it brings flake moisture down to a level the downstream process can handle. A healthy bearing is what keeps that stage running shift after shift.
Frequently Asked Questions
How often should centrifugal dryer bearings be replaced?
Typically every 12–18 months under normal two-shift operation, but the real trigger is condition: rising noise, vibration, or operating temperature means the bearing is already degrading. Monthly vibration or temperature checks catch failures before they become unplanned stops.
What are the signs of a failing dryer bearing?
Listen and feel for the early warnings: a growing rumble or whine at speed, vibration you can feel through the frame, the housing running hotter than usual, or grease leaking past the seals. Any of these warrants a planned shutdown for inspection.
Can I reuse the old bearing after disassembly?
Only if it passes inspection: smooth, quiet rotation by hand, no detectable play, intact seals, and no discoloration from overheating. In practice, once a dryer is opened for bearing work, most plants install a new bearing — the part cost is small compared to a second shutdown.
Why is the expansion sleeve so hard to remove?
The tapered sleeve creates an interference fit that tightens under load and can fret or corrode onto the shaft over time. Gentle, even tapping with a hammer and pry bar — plus penetrating oil on stubborn fits — usually frees it. Never cut the sleeve off with a torch; the heat damages the shaft journal.
What grease should I use on reassembly?
Use an anti-seize compound on the sleeve taper and shaft to ensure even seating, and pack the bearing itself with the grease type and quantity specified by the bearing manufacturer. Over-greasing causes overheating; under-greasing causes rapid wear.
How do I know the sleeve is driven in far enough?
Measure the bearing’s internal clearance reduction with a feeler gauge as you drive the sleeve — it must stay within the range specified for the bearing size. Too loose and the bearing creeps on the shaft; too tight and internal clearance disappears, guaranteeing early failure.
What causes repeated bearing failures on the same dryer?
Repeat failures usually point to a root cause beyond the bearing: shaft misalignment, rotor imbalance from uneven paddle wear, water ingress past failed seals, over-greasing, or running the dryer beyond its rated throughput. Fix the cause, not just the symptom.
Should the rotor be rebalanced after bearing replacement?
If only the bearing and sleeve were replaced and the rotor itself is undamaged and clean, rebalancing is generally not required. If paddles were replaced, material was welded on, or heavy buildup was removed unevenly, have the rotor dynamically balanced before returning to full speed.
Can I replace the bearing without removing the whole dryer?
Yes — the procedure above is designed for in-place service. The dryer stays on its frame; only guards, the bearing housing, and the shaft assembly are handled. Full dryer removal is only needed for frame or major rotor work.
Where can I get the correct spare bearings and seals?
Use the bearing designation stamped on the old bearing’s side face and order the same specification from a reputable brand (SKF, NSK, FAG, or equivalent). For a matched set of bearings, seals, sleeves, and locknuts sized to your dryer model, contact ASG with your machine’s serial plate details.
Inquiries
For professional support or spare parts for your centrifugal dryer, contact ASG — send us a message using the form below: